

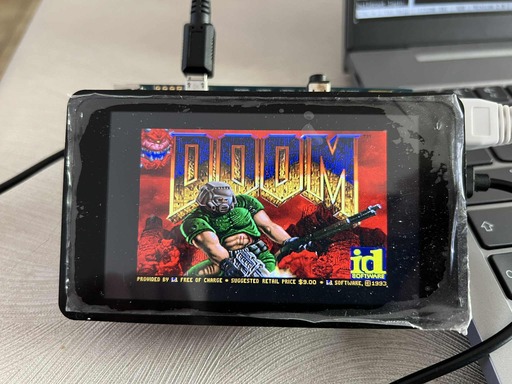
Can it run DOOM?
The first 3D game I ever played was DOOM on MS-DOS. It was a mind-blowing experience - the speed, the atmosphere, the thrill of exploring a 3D world rendered in real time on what now seems like an ancient system. For many of us, DOOM became an iconic milestone in the evolution of gaming history.
In 1997, the DOOM source code was released under a non-commercial license. This event raised the popular question “Can it run DOOM?”. This question usually arises when tinkering with unconventional hardware, ranging from printers and oscilloscopes to microcontrollers and smart devices.
If the answer to this question is yes, it probably means you were able to bend the system to your will.
That’s where this journey starts!
While I was experimenting with the STM32MP157F-DK2 development board, my interest got sparked to see how far I could go. This board features a dual-core Cortex-A7, some board connectors such as Ethernet, USB and a TFT LCD screen with capacitive touch. Not exactly a gaming device but definitely an interesting playground.
So to answer the age-old question: Can it run DOOM? Let’s find out!
What followed was a deep delve into the world of embedded Linux, cross-compilation and adapting existing Doom code to the needs of this platform.
This article will describe the journey of bringing DOOM to life on the STM32MP157F-DK2, from building an embedded Linux to choosing the right port to handling display and user input.
Preparing the Hellscape: Building the foundation
Porting DOOM is commonly done using one of two approaches: Either a bare metal approach or an approach involving an operating system (with a personal preference for embedded Linux). The bare metal approach is usually opted for when porting to a constrained device with minimal hardware resources. In this case, it is often necessary to strip down the game logic and rewrite graphic, audio and input layers using fixed point math because of the lack of a Floating Point Unit (FPU). But in my case, luckily, the STM32MP157F-DK2 provides sufficient hardware resources to run an embedded Linux.
To start compiling for a foreign architecture, a cross-compilation toolchain is needed. Crosstool-ng is a toolchain generator, supports many architectures and is easy to configure to the needs of the required toolchain. For this purpose, the cross-compilation toolchain should offer the following features:
- Compiling for the Cortex-A7
- Using hardware floating point support
- Target the Linux operating system (instead of creating a bare-metal toolchain)
- Providing a C library (musl was chosen in this case)
This brings us to the following Crosstool-ng settings:
CT_ARCH_ARM="arm"
CT_ARCH_CPU="cortex-a7"
CT_ARCH_FPU="vfpv4"
CT_ARCH_FLOAT="hard"
CT_LIBC_MUSL=y
CT_LIBC="musl"
With the cross-compilation toolchain in place, the build process can start. In order to make use of this toolchain, a couple of environment variables on the host need to be set:
export ARCH=arm
export CROSS_COMPILE=arm-linux-
export PATH=$PATH:/path/to/toolchain
By using this toolchain the whole system can be assembled layer by layer, in the following order:
Bootloader
(Since we are dealing with Armv7-A architecture, the Trusted Firmware-A (TF-A) loader precedes the actual bootloader step, which won’t be covered in this article.)
U-Boot is a flexible tool to build and configure a bootloader for an embedded system.
It already contains multiple configurations for different platforms, including one for stm32mp15. These files supply the user with a basic configuration for a platform, which then can be further fine-tuned.
It suffices to configure U-Boot to store the environment on an SD card (mmc device) in an ext4 filesystem.
Finally, U-Boot should know about the Device Tree, these can be found in the arch/arm/dts directory of the U-Boot source. In this case the closest one to our board would be stm32mp157c-dk2.
Linux kernel
The bootloader, built in the previous section, can now be configured to load and start the kernel.
We want to fine-tune the kernel configuration as much as possible to our needs. Similar to the U-Boot source, the kernel source comes with a set of predefined basic configurations (for arm in the arch/arm/configs directory) which can be further adapted.
As one of the kernel’s responsibilities is providing drivers for certain hardware peripherals, it was necessary to enable these in the kernel configuration. Obviously, a playable DOOM port would require a screen and some kind of input device for the game.
To provide graphic support, Direct Rendering Management needs to be enabled, in this case specific for STMicroelectronics SoC series with extensions for MIPI DSI. The board we are using is equipped with an Orise Technology otm8009a LCD panel, this needs to be enabled in the kernel configuration as well.
Since touchscreen controls wouldn’t be too convenient to play a First Person Shooter game (FPS) on, it would be nice of the kernel to provide us with a driver for a joystick, I opted for an Xbox 360 controller. Luckily the Linux kernel provides drivers for such controllers. The user input will be covered later in this article.
This brings us with the following kernel configuration options:
CONFIG_DRM=y
CONFIG_DRM_MIPI_DSI=y
CONFIG_DRM_STM=y
CONFIG_DRM_STM_DSI=y
CONFIG_DRM_PANEL_ORISETECH_OTM8009A=y
CONFIG_JOYSTICK_XPAD=y
CONFIG_JOYSTICK_XPAD=y
The configuration is now ready to cross-compile the kernel.
Root filesystem
At this point, we have an almost runnable embedded Linux. If we were to piece everything until now together, we would see an initializing kernel doing its job until a kernel panic would occur. This is because the last piece of the embedded Linux is still missing, being the root filesystem.
There are two common ways to obtain a root filesystem, which is using either Buildroot or Yocto. In this case Buildroot was utilised.
Like Linux in the previous section, Buildroot needs to be configured so it knows what and how it needs to build:
- target settings (architecture, ABI, floating points, …)
- the toolchain we previously built (location,
gccversion, C library, kernel header version, …) - the Linux kernel we previously built (
.configlocation, version, the Device Tree to be used, …) - configurations about the userland applications/packages that will be present. The most important one for a DOOM port is some application for graphics. This can either be a full window manager (which would be overkill for this purpose) or a graphical application layer such as Qt or SDL. The choice heavily depends on the pre-existing DOOM source code that will be used in this project.
- Buidroot should know which init system will be used (
busybox,systemd, …)BR2_arm=y BR2_ARCH="arm" BR2_ENDIAN="LITTLE" BR2_GCC_TARGET_ABI="aapcs-linux" BR2_GCC_TARGET_CPU="cortex-a7" BR2_GCC_TARGET_FPU="vfpv4" BR2_GCC_TARGET_FLOAT_ABI="hard" BR2_cortex_a7=y BR2_TOOLCHAIN=y BR2_TOOLCHAIN_USES_MUSL=y BR2_TOOLCHAIN_EXTERNAL=y BR2_TOOLCHAIN_EXTERNAL_CUSTOM=y BR2_TOOLCHAIN_EXTERNAL_PREINSTALLED=y BR2_TOOLCHAIN_EXTERNAL_PATH="/home/tim/x-tools/arm-training-linux-musleabihf" BR2_TOOLCHAIN_EXTERNAL_MUSL=y BR2_PACKAGE_HAS_TOOLCHAIN_EXTERNAL=y BR2_PACKAGE_PROVIDES_TOOLCHAIN_EXTERNAL="toolchain-external-custom" BR2_TOOLCHAIN_EXTERNAL_PREFIX="$(ARCH)-linux" BR2_TOOLCHAIN_EXTERNAL_BOOTLIN_ARCH_SUPPORTS=y BR2_TOOLCHAIN_EXTERNAL_CUSTOM_PREFIX="$(ARCH)-linux" BR2_TOOLCHAIN_EXTERNAL_GCC_14=y BR2_TOOLCHAIN_EXTERNAL_CUSTOM_MUSL=y BR2_TOOLCHAIN_EXTERNAL_HAS_SSP=y BR2_TOOLCHAIN_EXTERNAL_CXX=y BR2_LINUX_KERNEL=y BR2_LINUX_KERNEL_CUSTOM_VERSION=y BR2_LINUX_KERNEL_CUSTOM_VERSION_VALUE="6.12.28" BR2_LINUX_KERNEL_VERSION="6.12.28" BR2_LINUX_KERNEL_USE_CUSTOM_CONFIG=y BR2_LINUX_KERNEL_CUSTOM_CONFIG_FILE="board/bootlin/training/kernel.config" BR2_LINUX_KERNEL_ZIMAGE=y BR2_LINUX_KERNEL_DTS_SUPPORT=y BR2_LINUX_KERNEL_INTREE_DTS_NAME="st/stm32mp157c-dk2" BR2_PACKAGE_SYSTEMD_ARCH_SUPPORTS=y BR2_PACKAGE_SYSTEMD=y BR2_PACKAGE_SDL_FBCON=y BR2_PACKAGE_SDL1.0=y
Tying everything together
All components needed for a working embedded Linux on the STM32MP157F are now present. The only thing that still needs to be done is tying all of these together. For readers who are not familiar with the boot process on ARMv7 or ARMv8:

Source: https://bootlin.com/doc/training/embedded-linux/embedded-linux-slides.pdf
To simplify the picture above: ROM code loads the TF-A loader, the TF-A loader loads U-Boot, U-Boot on its turn loads the kernel into memory, passes the Device Tree Blob to it and starts the kernel. The kernel then mounts the root filesystem and starts the first userland application, being the init system, systemd in this case.
All of the described components were created earlier. Buildroot can now tie them together in U-Boot.
Note that TF-A is not covered in this article, an extensive article on this topic was written by my colleague Jean-Christophe Bauduin and can be found here.
During development, it is often useful to have the kernel image, Device Tree Blob and root filesystem stored on the host instead of the target. Therefore the kernel image and Device Tree Blob are served to the target over TFTP and the root filesystem over the Network File System protocol (NFS). U-Boot should be taught the following things:
- What is the IP address of the target & what is the IP address of the host?
- What is the name of the kernel image and Device Tree Blob, additionally on which memory addresses should these be stored?
- When the kernel is started, it needs to know things like where to send the console output, which baud rate and where to find the root filesystem that it needs to mount.
All the items described above can be stored in U-Boot environment variables.
U-Boot 2024.10-00001-gd77338bfb07a (June 04 2025 - 11:00:44 +0200)

CPU: STM32MP157FAC Rev.Z
Model: STMicroelectronics STM32MP157C-DK2 Discovery Board
Board: stm32mp1 in trusted mode (st,stm32mp157c-dk2)
Board: MB1272 Var4.0 Rev.C-02
DRAM:  512 MiB
Clocks:
- MPU : 650 MHz
- MCU : 208.878 MHz
- AXI : 266.500 MHz
- PER : 24 MHz
- DDR : 533 MHz
Core:  309 devices, 35 uclasses, devicetree: board
NAND:  0 MiB
MMC:   STM32 SD/MMC: 0
Loading Environment from EXT4... OK
In:    serial
Out:   serial
Err:   serial
Previous ADC measurements was not the one expected, retry in 20ms
****************************************************
*        WARNING 500mA power supply detected       *
*     Current too low, use a 3A power supply!      *
****************************************************

Net:   eth0: ethernet@5800a000

Hit any key to stop autoboot:  0
STM32MP> setenv bootargs "console=ttySTM0,115200 root=/dev/nfs ip=192.168.0.100 nfsroot=192.168.0.1:/home/tim/embedded-linux-labs/integration/nfsroot-systemd,nfsvers=3,tcp rw"
STM32MP> setenv bootcmd 'tftp 0xc2000000 zImage; tftp 0xc4000000 stm32mp157c-dk2.dtb; bootz 0xc2000000 - 0xc4000000'
STM32MP> saveenv
Saving Environment to EXT4... file found, deleting
update journal finished
update journal finished
done
OK
STM32MP> reset
<snipped for brevity>
Kernel image @ 0xc2000000 [ 0x000000 - 0x89a200 ]
## Flattened Device Tree blob at c4000000
   Booting using the fdt blob at 0xc4000000
Working FDT set to c4000000
   Loading Device Tree to cfff0000, end cffffc3b ... OK
Working FDT set to cfff0000

Starting kernel ...

[    0.000000] Booting Linux on physical CPU 0x0
[    0.000000] Linux version 6.12.28 (tim@TimMind) (arm-linux-gcc.bri real (Buildroot 2021.11-12449-g1bef613319) 14.2.0, GNU ld (GNU Binutils) 2.42) #2 SMP Mon May 26 09:37:26 CEST 2025
[    0.000000] CPU: ARMv7 Processor [410fc075] revision 5 (ARMv7), cr=10c5387d
[    0.000000] CPU: div instructions available: patching division code
[    0.000000] CPU: PIPT / VIPT nonaliasing data cache, VIPT aliasing instruction cache
[    0.000000] OF: fdt: Machine model: STMicroelectronics STM32MP157C-DK2 Discovery Board
<snipped for brevity>
Welcome to Buildroot
buildroot login: root
# ls /
bin      etc      lib32    mnt      root     srv      usr
boot     home     linuxrc  opt      run      sys      var
dev      lib      media    proc     sbin     tmp
When resetting the device, a fully functional Linux is present and ready to be used. Before proceeding, it’s a good idea to verify that all the components that were previously configured - and which are necessary to play DOOM - are present on the system.
- Verifying if there is graphical support, which was enabled in the kernel configuration earlier:
# dmesg | grep -i drm
[   18.418822] [drm] Initialized stm 1.0.0 for 5a001000.display-controller on minor 1
[   18.502860] [drm] Initialized etnaviv 1.4.0 for etnaviv on minor 0
[   19.166394] stm32-display 5a001000.display-controller: [drm] fb0: stmdrmfb frame buffer device
# cat /dev/urandom > /dev/fb0
The last command results in random noise on the screen:

- Verifying if there is a kernel driver module for the Xbox 360 joystick, which we enabled in the kernel as a module earlier.
# dmesg | grep -i -e xpad -e x-box
[ 5988.498867] input: Microsoft X-Box 360 pad as /devices/platform/soc/5800d000.usb/usb2/2-1/2-1.2/2-1.2:1.0/input/input2
[ 5988.509394] usbcore: registered new interface driver xpad
# lsmod
Module                  Size  Used by
xpad                   32768  0
An important topic which was not discussed yet, is which DOOM port we will use and adapt to our needs. Writing a DOOM port from scratch would take us too far and is beyond scope of this article.
A good place to start looking for a suitable DOOM port is the DOOM wiki source port page. This page contains an extensive list on existing source ports and their operating system compatibilities:

For this setup it is obvious that a *nix compatible source port is required. Furthermore it is also a good idea to pick a port that is as minimal as possible.
This brought me to SDL Doom. A minimal DOOM port, written in 1998, meant to run on UNIX based systems, with the only dependency being SDL 1! Sounds like a perfect base to fulfill our purpose!
SDL1 was installed earlier in the Buildroot configuration (this is one of the configured userland applications).
# find /usr/lib -iname "libsdl-*"
/usr/lib/libSDL-1.2.so.0.11.4
/usr/lib/libSDL-1.2.so.0
Unleashing hell on userland: Porting DOOM
The port
The only thing left now is the DOOM port itself. To put it simply, SDL Doom should be cross-compiled for our target, the same way as we cross-compiled the bootloader and kernel.
SDL Doom uses autotools as a build system. To generate the Makefile, the ./configure command can be utilised, here we can specify some options for the build system:
- A
SYSROOTlocation needs to be specified; This mimics the root directory of our target, since we built this earlier using Buildroot. For example, the SDL1 library is present in the target’s sysroot (for ARM) and not on the host’s root filesystem. - The build system should use the
arm-linux-*toolchain instead of the default native toolchain. - In this case, the
./configurescript expects flags such as--with-sdl-prefixand--with-sdl-exec-prefix, to specify where it should look for SDL. - To ensure the right toolchain is used, we specify flags such as
CC=arm-linux-gcc.
$ export SYSROOT=$HOME/integration/buildroot/output/host/arm-buildroot-linux-gnueabihf/sysroot
$ export CFLAGS="--sysroot=$SYSROOT -I$SYSROOT/usr/include"
$ export CPPFLAGS="$CFLAGS"
$ export LDFLAGS="--sysroot=$SYSROOT -L$SYSROOT/usr/lib"
$ ./configure --host=arm-linux --with-sdl-prefix=$SYSROOT/usr --with-sdl-exec-prefix=$SYSROOT/usr \
                   --without-mixer --without-net --disable-i386-asm --disable-gl --disable-sdltest \
                   CC=arm-linux-gcc CXX=arm-linux-g++ LD=arm-linux-ld AR=arm-linux-ar   AS=arm-linux-as   RANLIB=arm-linux-ranlib   STRIP=arm-linux-strip
This command generates a Makefile that make can use:
$ make
arm-linux-gcc -DPACKAGE=\"sdldoom\" -DVERSION=\"1.10\"  -I. -I.      -g -O2 -I/home/tim/embedded-linux-labs/integration/buildroot/output/host/arm-buildroot-linux-gnueabihf/sysroot/usr/bin/../../usr/include/SDL -D_GNU_SOURCE=1 -D_REENTRANT -c am_map.c
am_map.c: In function ‘AM_updateLightLev’:
am_map.c:786:12: error: type defaults to ‘int’ in declaration of ‘nexttic’ [-Wimplicit-int]
  786 |     static nexttic = 0;
      |            ^~~~~~~
am_map.c: In function ‘AM_clipMline’:
am_map.c:859:17: error: type defaults to ‘int’ in declaration of ‘outcode1’ [-Wimplicit-int]
  859 |     register    outcode1 = 0;
      |                 ^~~~~~~~
am_map.c:860:17: error: type defaults to ‘int’ in declaration of ‘outcode2’ [-Wimplicit-int]
  860 |     register    outcode2 = 0;
      |                 ^~~~~~~~
am_map.c:861:17: error: type defaults to ‘int’ in declaration of ‘outside’ [-Wimplicit-int]
  861 |     register    outside;
      |                 ^~~~~~~
am_map.c: In function ‘AM_drawFline’:
am_map.c:992:12: error: type defaults to ‘int’ in declaration of ‘fuck’ [-Wimplicit-int]
  992 |     static fuck = 0;
      |            ^~~~
make: *** [Makefile:157: am_map.o] Error 1
These first compilation errors are caused by old-style C-code that relied on implicit int type declarations, as allowed in pre-C99 standards. The used toolchain does not allow this anymore thus the code needs to be updated accordingly:
static int nexttic = 0;
register int outcode1 = 0;
...
We can now build again to find the next error.
$ make clean && make
r_data.c: In function ‘R_GenerateLookup’:
r_data.c:325:26: error: implicit declaration of function ‘alloca’ [-Wimplicit-function-declaration]
  325 |     patchcount = (byte *)alloca (texture->width);
      |                          ^~~~~~
r_data.c:325:26: warning: incompatible implicit declaration of built-in function ‘alloca’ [-Wbuiltin-declaration-mismatch]
r_data.c: In function ‘R_InitTextures’:
r_data.c:454:19: warning: incompatible implicit declaration of built-in function ‘alloca’ [-Wbuiltin-declaration-mismatch]
  454 |     patchlookup = alloca (nummappatches*sizeof(*patchlookup));
      |                   ^~~~~~
r_data.c: In function ‘R_PrecacheLevel’:
r_data.c:775:19: warning: incompatible implicit declaration of built-in function ‘alloca’ [-Wbuiltin-declaration-mismatch]
  775 |     flatpresent = alloca(numflats);
      |                   ^~~~~~
make: *** [Makefile:157: r_data.o] Error 1
The function alloca() allocates memory on the stack which is automatically freed. This is not a standard C function and might not be available in all toolchains. In order to replace this, we can safely use the malloc() and free() calls.
//patchcount = (byte *)alloca (texture->width);
patchcount = (byte*)malloc(texture->width);
memset (patchcount, 0, texture->width);
...
free(patchcount);
With this out of the way, a new build can be attempted:
$ make
...
...
arm-linux-gcc -DPACKAGE=\"sdldoom\" -DVERSION=\"1.10\"  -I. -I.      -g -O2 -I/home/tim/embedded-linux-labs/integration/buildroot/output/host/arm-buildroot-linux-gnueabihf/sysroot/usr/bin/../../usr/include/SDL -D_GNU_SOURCE=1 -D_REENTRANT -c z_zone.c
arm-linux-gcc  -g -O2 -I/home/tim/embedded-linux-labs/integration/buildroot/output/host/arm-buildroot-linux-gnueabihf/sysroot/usr/bin/../../usr/include/SDL
-D_GNU_SOURCE=1 -D_REENTRANT  -o doom
am_map.o d_items.o d_main.o d_net.o doomdef.o doomstat.o dstrings.o f_finale.o f_wipe.o g_game.o hu_lib.o hu_stuff.o i_main.o i_net.o i_sound.o i_system.o i_video.o info.o
m_argv.o m_bbox.o m_cheat.o m_fixed.o m_menu.o m_misc.o m_random.o m_swap.o p_ceilng.o p_doors.o p_enemy.o p_floor.o p_inter.o p_lights.o p_map.o p_maputl.o p_mobj.o
p_plats.o p_pspr.o p_saveg.o p_setup.o p_sight.o p_spec.o p_switch.o p_telept.o p_tick.o p_user.o r_bsp.o r_data.o r_draw.o r_main.o r_plane.o r_segs.o r_sky.o r_things.o
s_sound.o sounds.o st_lib.o st_stuff.o tables.o v_video.o w_wad.o wi_stuff.o z_zone.o -lm
-L/home/tim/embedded-linux-labs/integration/buildroot/output/host/arm-buildroot-linux-gnueabihf/sysroot/usr/bin/../../usr/lib -lSDL -lpthreadi
$ file doom
doom: ELF 32-bit LSB executable, ARM, EABI5 version 1 (GNU/Linux), dynamically linked, interpreter /lib/ld-musl-armhf.so.1, for GNU/Linux 3.2.0, with debug_info, not stripped
This time no errors were encountered, which is already a good thing. Now it is time to try run our STM32 DOOM version on our target. To do so, it needs to be transferred to our root filesystem, hosted over NFS. When trying to run DOOM on the target, the following error comes up:
# ./doom
-sh: ./doom: not found
# ls -al doom
-rwxr-xr-x    1 root     root        512976 Jun 5  2025 doom
This misleading error usually means that some library cannot be found, so let’s check:
# ldd doom
        linux-vdso.so.1 (0xbeff7000)
        libm.so.6 => /lib/libm.so.6 (0xb6f5d000)
        libSDL-1.2.so.0 => /lib/libSDL-1.2.so.0 (0xb6ef9000)
        libc.so => not found (0x00000000)
        /lib/ld-musl-armhf.so.1 => /lib/ld-linux-armhf.so.3 (0xb6fa6000)
It looks like it’s having troubles finding libc. However libc is installed on the target:
# find /lib /usr/lib -name "libc.so*"
/usr/lib/libc.so.0
/usr/lib/libc.so.1
/usr/lib/libc.so.6
It appears the system has multiple libc versions. In order to resolve this specific issue, it is sufficient to create a symlink to the libc.so that is required by DOOM.
# ln -s /usr/lib/libc.so.6 /lib/libc.so
# ./doom
Game mode indeterminate.
                     Public DOOM - v1.10
V_Init: allocate screens.
M_LoadDefaults: Load system defaults.
Z_Init: Init zone memory allocation daemon.
W_Init: Init WADfiles.
Error: W_InitFiles: no files found
We were able to successfully cross-compile and run DOOM on the target! Of course DOOM needs its “Where is All the Data” (WAD) files. This is like a package, used by the DOOM engine, which contains all the game data such as sprites, textures, … . More information on these WAD files can be found here. There are several sources where these can be obtained, one of them is DOOM1.wad. When trying to run DOOM with a WAD file:
# ./doom -i doom1.wad
                            DOOM Shareware Startup v1.10
V_Init: allocate screens.
M_LoadDefaults: Load system defaults.
Z_Init: Init zone memory allocation daemon.
W_Init: Init WADfiles.
 adding ./doom1.wad
added
===========================================================================
                                Shareware!
===========================================================================
M_Init: Init miscellaneous info.
R_Init: Init DOOM refresh daemon - [..                 ]
InitTextures
InitFlats........
InitSprites
InitColormaps
R_InitData
R_InitPointToAngle
R_InitTables
R_InitPlanes
R_InitLightTables
R_InitSkyMap
R_InitTranslationsTables
P_Init: Init Playloop state.
I_Init: Setting up machine state.
Error: Could not initialize SDL: Unable to open mouse
We now receive an SDL error. SDL expects that a mouse is present. One of the options to fix this, is:
# export SDL_NOMOUSE=1
We now have a first visible result:

This could be much better, if the DOOM screen was rotated by 90 degrees, we could resize it to make better use of the LCD screen. Unfortunately SDL1 does not support screen rotation, this leaves us with three possible approaches:
/sys/class/graphics/fbcon/rotate_all: this won’t work for our setup because our panel driver does not support it.- Porting everything to SDL2: This would be a lot of work.
- Writing a function to rotate the framebuffer by 90 degrees. This is probably the most simple solution, although not the most efficient:
void rotate_buffer_90(unsigned char *src, unsigned char *dst, int src_w, int src_h, int dst_pitch)
{
 int x, y;
 for (y = 0; y < src_h; y++) {
     for (x = 0; x < src_w; x++) {
         // 90 degree clockwise rotation: (x,y) -> (y, src_w-1-x)
         int dst_x = y;
         int dst_y = src_w - 1 - x;
         dst[dst_y * dst_pitch + dst_x] = src[y * src_w + x];
     }
 }
}
Now let’s add a
rotatestatic variable, such that screen rotation can be toggled:static int rotate_screen = 1; ... //I_FinishUpdate(void) is the function for updating the screen. void I_FinishUpdate (void){ ...; if(rotate_screen){ unsigned char *screen_pixels = (unsigned char *) screen->pixels; rotate_buffer_90(screens[0], screen_pixels, SCREENWIDTH, SCREENHEIGHT, screen->pitch); } ...; }As seen in the previous picture, the DOOM screen could use some scaling as well to make it larger. Luckily this was already an option in the source code:
// replace each 320x200 pixel with multiply*multiply pixels.
// According to Dave Taylor, it still is a bonehead thing
// to use ....
static int      multiply=2;
After all these changes, it is time to test everything again!
We are close to the desired result but one major piece is still missing in order to be playable: the user input.
User input
As mentioned earlier, we will use an old Xbox 360 controller as input device. Earlier we enabled kernel driver support for this. The kernel now makes a file available /dev/input/js0. The functioning of this file, is described on kernel.org. There are two main events, a button event (JS_EVENT_BUTTON, which acts as a digital press button and has a binary value of either 0 or 1) and an axis event (JS_EVENT_AXIS, which is like an analog joystick, having values between -32767 and +32767).
This knowledge makes it possible to process the buttons and their corresponding values with the following code:
int init_joystick(void){
    int js = open("/dev/input/js0", O_RDONLY | O_NONBLOCK);
    if(js < 0){
        printf("Could not open device: /dev/input/js0\n");
        return -1;
    }
    return js;
}

int main(void){
    int js_fd = init_joystick();
    struct js_event event;
    while(1){
        if(read(js_fd, &event, sizeof(event)) > 0){
            printf("Event type: %d\tnumber: %d\tvalue: %d\n", event.type, event.number, event.value);
        }
    }
    return 0;
}
For example when pressing and releasing button ‘A’, the output is:
Event type: 1	number: 0	value: 0
Event type: 1	number: 0	value: 1
This is because it’s a JS_EVENT_BUTTON with a value of 0 or 1.
For the DOOM port I opted to use the controller’s D-Pad for movement, I expected these to be JS_EVENT_BUTTON’s, however to my surprise, they appeared as JS_EVENT_AXIS! Meaning that the D-Pad is seen as an analog joystick. For example, when the D-Pad left button is pressed and released:
Event type: 2	number: 6	value: 32767
Event type: 2	number: 6	value: 0
In order to read the joystick properly, a struct was used to keep the state of the buttons together with the /dev/input/js0 file descriptor:
typedef struct XJoystick{
        int js_fd;
        uint16_t btn_state; //X|X|X|X|X|X|BACK|START|A|B|X|Y|UP|DWN|LFT|RGT
}XJoystick;
Additionaly a function named poll_joystick(XJoystick* js); was written, the purpose of this function is to populate the btn_state variable. This variable is responsible of holding the state of each corresponding button. This function looks like the following:
int poll_joystick(XJoystick* js){
        struct js_event event;
        if(read(js->js_fd, &event, sizeof(event)) > 0){
                uint8_t etype = event.type;
                uint8_t enumber = event.number;
                int16_t evalue = event.value;
                if(etype == JS_EVENT_BUTTON){
                        if(enumber == EVBTN_A && evalue == EVBTN_PRESS){
                                DEBUG_PRINT(("Button %c pressed.\n", 'A'));
                                set_bit(&js->btn_state, XBTN_A);
                        }else if(enumber == EVBTN_A && evalue == EVBTN_RELEASE){
                                DEBUG_PRINT(("Button %c released.\n", 'A'));
                                clear_bit(&js->btn_state, XBTN_A);
                        }
                        ...
                }else if(etype == JS_EVENT_AXIS){
                        if(enumber == EVD_PAD_X){
                                if(evalue == X_AXIS_LEFT){
                                        DEBUG_PRINT(("D-Pad left pressed.\n"));
                                        set_bit(&js->btn_state, XBTN_LFT);
                                        clear_bit(&js->btn_state, XBTN_RGT);
                                }else if(evalue == X_AXIS_RELEASE){
                                        if(check_btn(js->btn_state, XBTN_RGT)==1){
                                                DEBUG_PRINT(("D-Pad right released.\n"));
                                                clear_bit(&js->btn_state, XBTN_RGT);
                                        }else{
                                                DEBUG_PRINT(("D-Pad left released.\n"));
                                                clear_bit(&js->btn_state, XBTN_LFT);
                                        }
                                }else if(evalue == X_AXIS_RIGHT){
                                        DEBUG_PRINT(("D-Pad right pressed.\n"));
                                        set_bit(&js->btn_state, XBTN_RGT);
                                        clear_bit(&js->btn_state, XBTN_LFT);
                                }
                        }
                        ...
                }

        }
        ...
}
What’s left now is to merge this code into SDL Doom.
SDL Doom handles input in the following way:
void I_StartTic (void)
{
    SDL_Event Event;

    while ( SDL_PollEvent(&Event) )
        I_GetEvent(&Event);
}
This code checks for events and forwards them to an event queue that is accessible by the DOOM engine.
The I_GetEvent(SDL_Event *Event) is a simple function that checks whether an event is a key up or key down event, translates it to its corresponding ASCII value, and posts it to the event queue.
void I_GetEvent(SDL_Event *Event)
{
    Uint8 buttonstate;
    event_t event;

    switch (Event->type)
    {
      case SDL_KEYDOWN:
        event.type = ev_keydown;
        event.data1 = xlatekey(&Event->key.keysym);
        D_PostEvent(&event);
        break;

      case SDL_KEYUP:
        event.type = ev_keyup;
        event.data1 = xlatekey(&Event->key.keysym);
        D_PostEvent(&event);
        break;
        ...
    }
}
This code is well suited to be replaced by our poll_joystick(XJoystick* js); function:
void I_StartTic (void)
{
    static uint16_t prev_btn_state = 0x0;
    if(js.js_fd == -1){
            init_joystick(&js);
            printf("Init joystick done.\n");
    }
    event_t event;
    poll_joystick(&js);
    if(js.btn_state != prev_btn_state){
            uint16_t changed = js.btn_state ^ prev_btn_state;  // XOR to find changed bits
            uint16_t pressed = changed & js.btn_state;         // Changed AND currently set = newly pressed
            uint16_t released = changed & prev_btn_state;      // Changed AND previously set = newly released
            while(pressed){
                    uint8_t btn = __builtin_ctz(pressed);
                    pressed &= pressed - 1;
                    event.type = ev_keydown;
                    event.data1 = xlatekey(btn);
                    D_PostEvent(&event);
            }
            while(released){
                    uint8_t btn = __builtin_ctz(released);
                    released &= released - 1;
                    event.type = ev_keyup;
                    event.data1 = xlatekey(btn);
                    D_PostEvent(&event);
            }
            prev_btn_state = js.btn_state;
}
The above code holds a static uint16_t prev_btn_state; variable, whenever the poll_joystick(&js) puts data in the js.btn_state register, it is compared if the data is the same as in the prev_btn_state register. If it is not the same, a button was pressed or released. By comparing these two button state registers, it is possible to check whether a button was pressed or released (key up or key down event). The only thing left is translating the button value to its corresponding ASCII value so the DOOM engine can receive this through the event queue:
int xlatekey(int btn){
        switch(btn){
                case XBTN_LFT:
                        return KEY_LEFTARROW;
                case XBTN_RGT:
                        return KEY_RIGHTARROW;
                case XBTN_UP:
                        return KEY_UPARROW;
                case XBTN_DWN:
                        return KEY_DOWNARROW;
                case XBTN_A:
                        return KEY_RCTRL;
                case XBTN_B:
                        return ' ';
                case XBTN_START:
                        return KEY_ENTER;
                case XBTN_BACK:
                        return KEY_ESCAPE;
        }
}
When recompiling SDL Doom and running it on our target, it works!

One bug in the input remained; When pressing D-Pad down, we expect our character to move backwards. Instead of moving backwards, it moved forward at twice the speed of the normal D-Pad up button.
When the D-Pad down or up button is pressed, the following code comes into play:

Where the forward variable is of type int and when forward += forwardmove[speed]; is executed, the value of forward should become 25. When forward -= forwardmove[speed] is executed, forward should become -25. However, it becomes a very large number instead. This points in the direction of some integer overflow or type conversion error.
After this, the forward value gets assigned to cmd->forwardmove = forward;.
When having a look at the cmd struct, we can see that the issue was indeed a type conversion issue!

char forwardmove; and forward is declared as a (signed) integer and gets assigned to a char. This might work in some cases but the signed semantics of char is implementation defined, which means it depends on the compiler used. In our case it appears char is not signed. This issue could easily be solved by changing it to: signed char forwardmove;
Polishing the landscapes of Hell
We now have a working and playable DOOM port. But as I explained earlier, the root filesystem is still mounted over NFS, the kernel image and Device Tree Blob are served over TFTP. When booted, DOOM also needs to be started from the console. This is very inconventient. To address this issue, everything can be put on an SD card (the kernel image, Device Tree Blob and root filesystem).
Before doing so it is a good idea to make sure DOOM is started at boot. Since we are using systemd as an init system, let’s also create a systemd service file for this task, located in /etc/systemd/system/doom-autostart.service:
[Unit]
Description=Doom Port
After=multi-user.target network.target
Requisite=multi-user.target

[Service]
Type=simple
User=root
Group=root
Environment="DISPLAY=:0"
Environment="SDL_NOMOUSE=1"
Environment="SDL_VIDEODRIVER=fbcon"
WorkingDirectory=/root/
ExecStart=/bin/sh -c 'while [ ! -c /dev/fb0 ]; do sleep 2; done; exec /root/doom-wrapper.sh'
Restart=on-failure
RestartSec=10
StandardOutput=journal
StandardError=journal

[Install]
WantedBy=multi-user.target
Requires=multi-user.target
For convenience I used a bash wrapper script in order to start DOOM on boot:
#!/bin/sh
export SDL_NOMOUSE=1
/root/doom -i /root/doom1.wad
Now the service can be enabled and started:
systemctl daemon-reload
systemctl enable doom-autostart.service
systemctl start doom-autostart.service
When booting the system, DOOM is automatically started.
With this out of the way, the only thing left is putting everything on an SD card.
At this moment the SD card is partitioned the following way:
Number  Start   End     Size    File system  Name    Flags
 1      1049kB  2097kB  1049kB               fsbl1
 2      2097kB  3146kB  1049kB               fsbl2
 3      3146kB  5243kB  2097kB               fip
 4      5243kB  67.1MB  61.9MB  ext4         bootfs
We can use the remaining space to store our root filesystem as a squashfs image.
(parted) mkpart rootfs ext4 131072 100%
The existing root filesystem which was hosted over NFS, can be squashed to an image and written to our newly created partition:
$ mksquashfs nfsroot/ rootfs.sqsh
$ dd if=rootfs.sqsh of=/dev/mmcblk0p5 bs=4M status=progress conv=fdatasync
As for our kernel image and Device Tree Blob, they can be stored on the bootfs partition of the SD card:
$ mount -t ext4 -o loop /dev/mmcblk0p4 /mnt/boot
$ cp /srv/tftp/zImage /mnt/boot
$ cp /srv/tftp/stm32mp157c-dk2.dtb /mnt/boot
$ umount /mnt/boot
The final step is to update the U-Boot configuration on the target:
U-Boot 2024.10-00001-gd77338bfb07a (May 20 2025 - 16:00:44 +0200)

CPU: STM32MP157FAC Rev.Z
Model: STMicroelectronics STM32MP157C-DK2 Discovery Board
Board: stm32mp1 in trusted mode (st,stm32mp157c-dk2)
Board: MB1272 Var4.0 Rev.C-02
DRAM:  512 MiB
Clocks:
- MPU : 650 MHz
...
STM32MP> setenv bootcmd "load mmc 0:4 0xc2000000 zImage; load mmc 0:4 0xc4000000 stm32mp157c-dk2.dtb; bootz 0xc2000000 - 0xc4000000"
STM32MP> setenv bootargs "console=ttySTM0,115200 root=/dev/mmcblk0p5 rootwait"
STM32MP> saveenv
Saving Environment to EXT4... file found, deleting
update journal finished
update journal finished
done
OK
The bootcmd loads the fourth partition of the first MMC device and puts the zImage on the specified address and does the same for the Device Tree Blob. The bootargs now specify that the root filesystem is located on the fifth partition of the mmcblk0 device. The rootwait command makes sure that the kernel waits until the SD peripheral is properly initialised before the root filesystem can be mounted.